Mold is a very common problem, and almost every home encounters it at some point. We have compiled some steps on how to recognize and eliminate infestations, large and small. However, before you get started, here are some things you will need to do the job right.
Tools And Supplies Needed For This Project
You will save time and energy if you have these tools and supplies readily available before you start:
- Window fan
- Scrub brush
- Paintbrush
- Safety glasses
- Rubber gloves
- Shop vacuum
- Utility knife
- Drywall saw
- N-95 respirator
- Shellac or oil-based primer
- Plastic sheeting
- Painters tape
- 6 mil plastic garbage bags
- Heavy-duty cleaner
- Bleach
Step 1: Stop It Immediately
Having mold in your home is annoying and can cause health problems. Some ways that it affects you and your home are:
- Darkening decks
- Growing on and rotting damp wood
- Discoloring drywall
- Staining grout lines in your shower
- Showing up as black spots on siding
- Emitting strong, possibly hazardous odors
- Releasing spores that can cause allergic reactions
The most important thing you can do with mold infestations is stop them at once. The faster you take care of the problem, the less damage they will do to your home and your health.
Minor mold issues can be easily taken care of with regular household cleaning products. This is not the case with bigger infestations. They can be very bad for your health, especially if you have a weakened immune system or usually suffer from allergies.
If you find that you have a massive mold problem, use the steps below to eliminate it. You can also contact a professional mold remediation company to help like Mission Restorations. You can find them listed as “Environmental and Ecological Consultants” or “Industrial Hygiene Consultants.” Contacting your local health department is also an option.
CAUTION! Some types of mold are very harmful. If you have a giant mold problem or are experiencing an allergic reaction, contact a professional right away. They will inspect and analyze the types of mold that are in your home. You can also call your local health department and request advice on mold testing.
Step 2: Identifying Mold
Mold is a fungus that comes from tiny spores that float in the air. When a spore lands in a warm (between 40 and 100 degrees) and humid environment, mold thrives. Unfortunately, this is practically every damp place in your house.
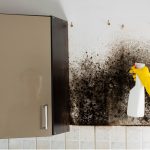
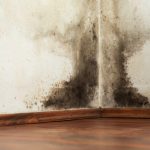
Mildew is the most visible and easily spotted type of mold. It usually starts as tiny black spots and often grows into bigger groups. Mildew is the black stuff seen on damp walls and the grout lines in your shower. Outside they are found on the surfaces of painted siding and deck boards, particularly in shady, damp areas.
It is not easy to tell if a surface has mildew or is just dirty. Using bleach is a great way to test for mildew. Dab a few drops on the blackened area and wait a few minutes. If the spots have lightened, then it is mildew. If they are still black, it’s probably dirt.
Certain types of mold will damage your home’s structure from rot. Mildew is not one of them. To determine what kind of mold you have, probe the area with a sharp tool like a screwdriver. If the wood crumbles or is soft, the mold has already started causing rot.
With large amounts of mold in your home, you might begin to smell it. If you start to notice a musty odor, check for mold on:
- Walls that are damp
- Wet wood under your floors
- Damp carpets
- Crawlspaces that are damp
- Wet roof sheathing
- Any other damp areas
It is important that you clean the affected areas immediately before they get worse.
Step 3: Eliminating Mold-Damaged Areas
As mentioned before, you can easily scrub away surface mold found in bathrooms and on decks and siding. A one-part bleach to eight-part water solution can get rid of that type of mold in minutes. However, mold often grows in areas not easily noticeable until it gets bad enough. When this happens, you begin to see surface staining, detect a musty odor, or feel squishy drywall.
When the mold covers more than a few square feet, there is severe water damage, or the dank smell is strong, you will need to be careful. Be sure to avoid spreading the damage to the rest of the house and protect yourself from the spores. Here are some precautions to keep in mind:
- Wear goggles, gloves, and special N-95 or P-100 respirators. Also be sure to wear old shoes and clothes that can be washed or thrown away after cleanup.
- Do not run the HVAC system. Cover up doors and ducts to contain the spores.
- Run a box fan in the window to ventilate the area you are working in. Tape cardboard around the window openings so that the spores won’t come back inside. Make sure to throw away the fan when you are done cleaning. It is almost impossible to clean the spores off of it.
- Keep your wet/dry vacuum outside while vacuuming.
- While you work, dampen the moldy areas with a garden sprayer. This will help control airborne spores.
- For disposal, double-bag mold-infested materials in trash bags. Wrap and tape moldy carpeting in 6-mil plastic.
For carpet that has been damaged, cut the stained pieces and pads into 6×8-ft sections with a utility knife. Mist the surfaces with a pump sprayer to control the spread of spores. To dispose of the materials, roll up the sections, double-wrap the materials in 6-mil plastic, and tape with duct tape.
When damage has been done inside the walls, you will need to open up the wall to access the mold inside. The wall will need to be repaired anyway, so do not worry that yo will have to cut the drywall back beyond the noticeable damage. This will help make sure you locate all the mold and let the wall dry out.
Poke a hole through the damaged wall, so that you can locate the electrical wires and prevent from accidentally cutting them. Before you cut, make sure to turn off the power to the outlets.
There will likely be rot if the water damage has been left or gone unnoticed for too long. If possible, clear away and replace the wall sheathing and soft, spongy studs.
Where removal is challenging, clean the wood and let it dry. Treat the affected areas with a wood preservative (found at home centers), and double up rotted components with pressure-treated wood.
Mold Prevention Tips
The most important factor to stopping mold is to control moisture. The worst damage usually happens in these areas:
- Basements with poor foundation drainage
- Walls and attics where outside water leaks in
- Damp crawl spaces
Your best protection against these problems causing permanent damage are:
- Route water away from the foundation
- Make sure you have good ventilation in attics
- Stop leaks right away
- Keep crawlspaces dry
- Use paint that contains mildewcide
Many paints already have mildewcide in them. It is very effective in preventing surface mold in damp places such as bathrooms and shady areas outside. Ask your paint dealer if your paint contains mildewcide. If it doesn’t, you can always add it, but you might void the paint warranty.
Step 4: Damage Cleanup and Restoration
Once you have eliminated the mold-damaged areas, it is time to begin the cleanup and restoration.
- Begin cleanup by vacuuming up the remains. Run an extra length of hose out the window so you can keep the vacuum outside. This will avoid spreading the mold spores even further.
- After vacuuming is complete, make sure to efficiently clean the wet/dry vac. Throw out the filter and use a bleach-and-water solution to wash out the hose, tank, and attachments.
- Scrub surfaces and leave the bleach solution sitting for a time so it can permeate the areas and dry. Use dishwasher detergent, TSP, or a chlorinated cleaner like Comet to wash concrete floors.
- Set out new fans and dehumidifiers in the newly cleaned areas for at least three days. Afterward, inspect the areas for mold. If you can see or smell any mold, clean the area once again with bleach.
- When you are certain the mold has been eradicated, seal the wood surfaces with an oil-based primer like KILZ, or pigmented shellac like BIN.
- To help prevent future mold growth, repaint the cleaned wall surfaces with a paint that has mildewcide.
Remember: If dampness or moisture returns, mold will come right along with it.
Surface Mold Cleaning Methods
You have most likely seen surface mold growing in the grout lines of your shower or bath. This is because mold thrives where there is sufficient moisture. Luckily, it is easy to clean with a mixture of ½ cup bleach, 1 Qt water, and a little detergent. The bleach destroys the mold, while the detergent lifts it off the surface to be rinsed away. You can also get rid of mold with mildew cleaner from a hardware store, home center, or paint store.
Even with easy cleaning, be sure to protect yourself from the bleach and mold. Wear goggles, rubber gloves, and a long-sleeve shirt and pants.
If the mold remains after light scrubbing, apply more cleaner. Let it sit for a few minutes and then scrub again.
Once the cleaned area is completely dry, seal it to prevent future moisture infiltration. Use a grout sealer (found at home centers and tile shops) to the tile joints.
CAUTION! Do not mix bleach with ammonia or any cleaner containing ammonia. Together, it forms a poisonous gas.
If the mold infestation is small, following these tips will help you take care of the problem and prevent further issues. However, if the infestation is large, you may want to hire a professional mold remediation company instead of doing it yourself. Remember, removing mold incorrectly will only make the problem worse as mold spores spread. A professional will follow the steps listed above, but they have the right tools and expertise to do so.